Five-star candle-lit dinner, little blue boxes with big diamonds or an apartment filled with dozens of long-stem roses, yes, we’ve all seen the sentiments of love expressed throughout our lives, if only via a box-office hit.
Yet, for as romantic and tremendously generous such expressions of love are, a Valentine’s Day gift can be just as grand without all the decimal points. Here’s one DIY Valentine’s Day gift you can make for less than $20: The Sweetheart Plate.

How To Make a DIY Valentine’s Day Gift for Less Than $20
“We want this event to be something that really represents what you do so well with Thrifty Vintage Chic — taking vintage and creating elegant styles that are modernly relevant.”
Like a golden muse, Cait from Goodwill Industries of Greater New York & New Jersey opened a floodgate of inspiration in my mind during our first conference call regarding a “Thrifty Vintage Chic” event at one of the East Harlem location for Valentine’s Day.
What kind of DIY-upcycled project could channel the true heart and soul of Thrifty Vintage Chic? It had to be something of nostalgic romance, but timeless, and easy to do with the upcycled items readily available at any Goodwill location across the country, hmmm …
“Sweetheart pillows!”
 I nearly shouted in everyone’s ears, as my bursts of excited inspiration often tend to know no filter, and then like a second year filly on the track for the first time, I raced through the history and how it was the perfect DIY-vintage Valentine.
In WW1 and WW2, fellows away at US-based training camps would send back home “Sweetheart Pillows” which were actually pillow shams usually printed with a border design, a main illustration, scene or emblem, and a poem.
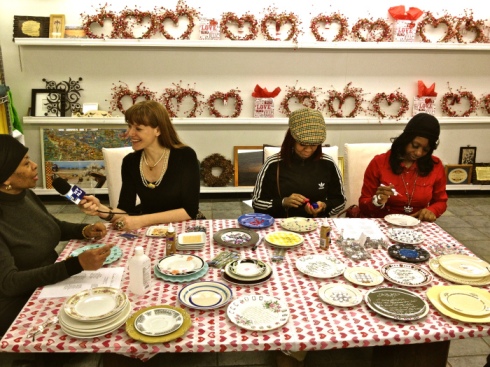
So it seemed to me, the perfect modern take on this vintage collector’s item would be to create “Sweetheart Plates” using random china plates, embellishments and the original Sweetheart Pillow poems.
How to Make Your Own Sweetheart Plate
STEP ONE: Go Thrifting. Pick a plate that speaks to you, and consider one that has a shallow bowl”. This will make it easier to embellish and inscribe, later.
TIP: Consider the personality and style of the person whom you are giving this to. If it is for a man, consider plates with strong masculine colors and lines.

STEP TWO: Clean the Plate. Wash normally, and if price tag residue remains, use a razor blade or rubbing alcohol to remove remnant residue.
STEP THREE: Pick Your Sentiment. Write an original sonnet or choose an original 1940s poem from vintage Sweetheart Pillows. (CLICK HERE for options!)

STEP FOUR: Plan Your Design. Consider where the sentiment will be written — on the rim, or on the bowl area. Then, pick which embellishments you’ll use and place according to the design you want to create.
STEP FIVE: Test Your Pen. Use the back of the plate as a practice inscription to get a feel for the ink’s weight and glide over the surface of the plate’s glaze.

TIP: Use an oil-based paint marker. I recommend Sharpie, which offers various weights.
STEP SIX: Write Your Sentiment. You can create a pattern by cutting a sheet of paper as the same size of your plate, and practice your penmanship and spacing. Then, do it for real — take a deep breath and just relax. It doesn’t have to be perfect, it just needs to be made with love.
TIP: If you make a mistake, a little bit of rubbing alcohol on a cotton swab can act as a quick eraser before the ink sets.
STEP SEVEN: Adhere Embellishments. While the ink dries, layout your embellishment design on the plate, and start gluing to the surface using a speciality product for glass, such as “Aleene’s Glass & Bead Adhesive”.

TIP: Using regular, or special craft tweezers, can help keep your fingers from getting sticky from glue, while allowing you to be more accurate in placing the embellishments.
STEP EIGHT: Primp the Plate. Before you let the link and adhesive completely cure, take a look to see if there are any accidental ink or glue smudges. These can be cleaned up with a little rubbing alcohol on a cotton swab.
STEP NINE: Give It TLC. Let the plate dry in a safe, dry area without extreme temperature changes or exposure, for 24-48 hours.
TIP: To clean in the future, dust with a dry or damp cloth. Do not use harsh cleaning products, such as “Windex” which contains ammonia and may strip the ink and embellishments of their finish.

STEP TEN: Bow It. Gift wrap your Sweetheart Plate, and be ready to bask in the love of your Sweetie!
If this vintage-inspired DIY Valentine has inspired you, won’t you please let me know, below. Better yet, share with me your Sweetheart Plate by e-mailing a photo to me: rwallace@thriftyvintagechic.com. That would make my day!
Happy Valentine’s Day!
In style & Vintage Love, Robin


Leave a comment